You already have everything you need to make a music video
For a long time, making a real music video meant either hiring an editor or wrestling with a desktop app that costs money, eats disk space, and takes a weekend to learn. If you make music, that gap is frustrating: the song is done, you want a video for it today, and the tooling stands in the way.
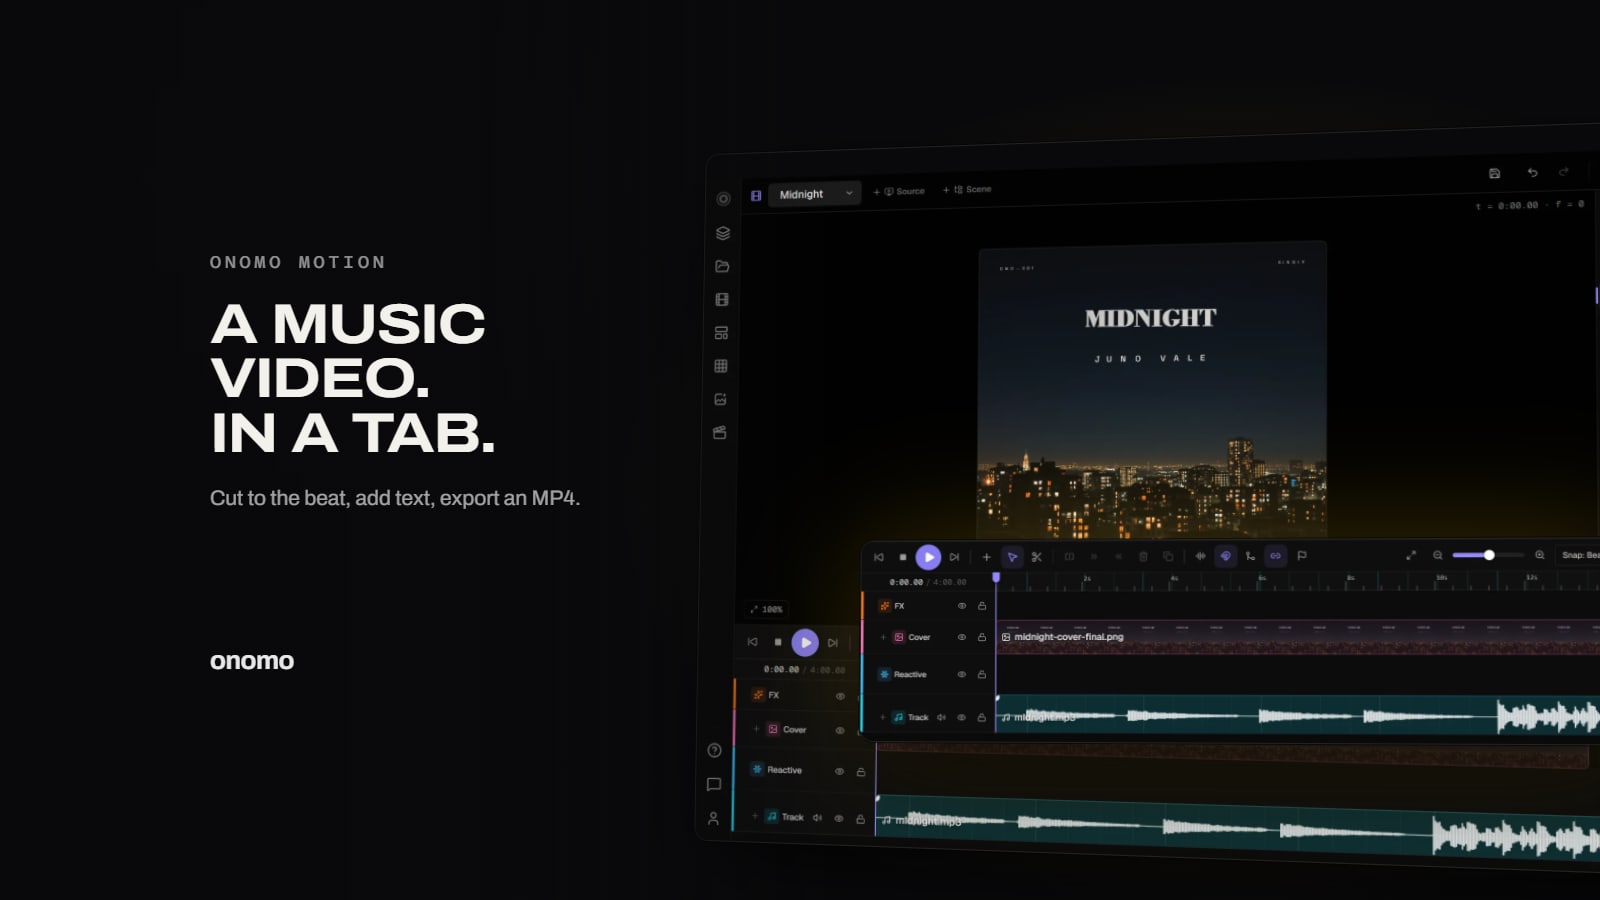
Onomo's Motion closes that gap. It is a genuine music-video editor that runs entirely in your browser — a clip-based, multi-track timeline built specifically around a song. There is nothing to download and nothing to pay for to build and export a video. You load your track, cut your visuals to the beat, layer in text and effects, and render an MP4. This guide walks the whole workflow end to end, so by the time you finish reading you'll know exactly how to make a music video online for free.
Motion is built for music-forward video: full music videos, lyric videos, visualizers, looping cover videos, and reels or shorts. The thing that makes it different from a generic online editor is that it understands your song's structure — its bars, its beats, and where the hits land in the low, mid, and high end — and lets your edits and your visuals lock onto that.
Step 1: Load your song and meet the beat grid
Everything starts with the audio. Drop your track onto the timeline and Motion analyzes it. The most important thing it builds is the beat grid: a set of guide lines laid over the timeline at the song's bars and beats.
This grid is what makes cutting feel effortless. When you trim a clip or drop a cut, it snaps to the nearest bar or beat instead of landing on some arbitrary frame. That single behavior is the difference between a video that feels tight and one that feels slightly off in a way viewers can't name but always feel. You're no longer eyeballing where the downbeat is — the editor already knows.
Practically, this means you can build a montage that changes shot on every other bar, or punch a hard cut exactly on the drop, without zooming in and hunting for the transient. The grid does the precision for you.
Step 2: Add your visual layers
With the song in place, you build the picture. Motion is multi-track, so you stack layers and they composite top-to-bottom, the way you'd expect from any real editor. Your raw material can be:
- Video clips — performance footage, B-roll, anything you import.
- Still images — your cover art, photos, graphics, screenshots.
- Generated backgrounds — built-in "web effects" like matrix-rain, aurora, halftone, and equalizer-bars that give you motion without any source footage.
- Audio-reactive generators — starfields, plasma, god-rays, and waveform bars that move on their own.
- Particles — sparks, dust, confetti-style systems you can layer over anything.
A common starting recipe: a generated or video background on the bottom track, a particle layer above it for texture, and your title or lyric text on top. Because the timeline snaps to the grid, you can have a clip start exactly on bar 9 and end on bar 17 without measuring anything.
Step 3: Add titles and text with the text engine
Music videos live and die on their typography, and Motion's text engine is one of its deepest features. You get a large library of animated text styles plus reveal animations that you can apply per character, per word, or per line: fade, slide, scale-pop, blur-in, typewriter, karaoke, and bounce, among others.
That granularity is what lets a title feel produced. A song name can blur into focus a character at a time, an artist tag can slide up word by word, and a feature credit can typewriter across the screen. You're not picking from three canned presets — you're directing how the words arrive.
If your video is specifically a lyric video, the text engine is the heart of it, and Motion has a whole separate workflow for timing words to the song automatically. That's covered in its own guide: how to make a lyric video with auto-sync.
Step 4: Effects and transitions
Once your layers are down, you shape the look. Motion includes built-in effects you'd expect from a serious editor — blur, glitch, grain, RGB-split, and color grading — alongside the generated web effects mentioned earlier. Color grading alone does a lot of heavy lifting: a cohesive grade across all your clips is the fastest way to make footage from different sources feel like one piece.
Between clips, you get a library of transitions — fades, wipes, cube turns, card-flips, and more. The guideline most editors learn the hard way: pick one or two transitions and use them consistently. A hard cut on the beat is often stronger than any fancy wipe, and the beat grid makes those hard cuts trivial to place. Save the cube turn for the moment that earns it.
You can also use masks to reveal one layer through the shape of another, and per-parameter keyframing when you want to animate a value by hand over time — drift a background's position, ramp a blur in and out, fade a layer on a curve you control.
Step 5: Make the visuals react to the music
This is Motion's signature, and it's what separates a slideshow from a music video. You can bind a visual parameter — scale, opacity, blur, position, color — to a specific part of your song: the hits in the low, mid, or high end, the energy in a band, or the pitch of the melody. The title punches on the kick, the background swells with the bass, a glow rises and falls with the tune. The picture moves with the arrangement instead of floating on top of it.
It's a big enough feature that it has its own deep-dive: how to make audio-reactive visuals by binding effects to the music. Read that when you want the full control set.
One honest note on how this works, because it matters: a mixed song doesn't contain separate instruments, so Motion doesn't pretend it does. Its sources — hits, band energy, level, pitch — are read straight from your track and are true of any audio. When you want one instrument on its own, load a stem pack (exported from Studio or split with the Stem Splitter): each stem lands on its own audio track, and a binding pointed at the kick track reacts to the kick alone.
Step 6: Export an MP4 for your platform
When the video looks right, you render it. Motion exports MP4 (H.264) using a WebCodecs engine that runs in your browser — no upload to a server, no render queue, no watermark.
Before you export, set your aspect ratio to match where the video is going. Motion gives you presets for:
- 9:16 — TikTok, Instagram Reels, YouTube Shorts.
- 1:1 — square posts and feeds.
- 4:5 — the taller portrait crop that performs well in feeds.
- 16:9 — YouTube and any landscape destination.
There are also per-platform bitrate presets, so you're not guessing at quality-versus-filesize. Pick the destination, pick the aspect ratio, export, and you have a finished file ready to upload.
A useful habit: if you want the same video on YouTube and in Reels, build it once at 16:9, then duplicate and re-frame for 9:16. Reusing the same project beats rebuilding from scratch.
A realistic first project
Here's a path that gets you a finished video fast:
- Open a visualizer or lyric-video template so you start from a working arrangement.
- Drop in your song; let the beat grid populate.
- Replace the placeholder background with your footage or a generated effect, and add a particle layer for texture.
- Set your title with an animated reveal from the text engine.
- Bind the title's scale to the bass hits so it pulses on the kick.
- Apply a single color grade across the whole thing for cohesion.
- Set the aspect ratio, then export the MP4.
That's a complete, beat-synced music video built and rendered without installing anything.
FAQ
Is Motion really free? Yes. It runs in your browser, and you can build and export videos without paying or installing software.
Does it work on my phone? Motion runs in a modern mobile browser, but the timeline, keyframing, and fine cutting are far easier on a larger screen. Most people build on a laptop or desktop and use the phone mainly to preview and upload the result.
Do I need to provide separate instrument stems for the reactive effects? No. Hits, band energy, level, and pitch all work on your single mixed song. Stems are optional — load a stem pack when you want a binding to follow one instrument on its own track.
What format does it export? MP4 (H.264), rendered locally via WebCodecs, with aspect presets for 9:16, 1:1, 4:5, and 16:9 and per-platform bitrate options.
Can I make a vertical video for TikTok and Reels? Yes. Choose the 9:16 preset before exporting. You can also keep one project and re-frame it to other aspect ratios for other platforms.
Is this only for full music videos? No. The same editor handles lyric videos, visualizers, looping cover videos, and short-form reels. The beat grid, text engine, and reactive effects apply across all of them.
Make your video today
The song is already done — the video shouldn't take a weekend. Open Motion, load your track, and cut your first sequence to the beat grid. Between the templates, the text engine, and effects that react to your own music, you can have a finished, platform-ready MP4 in a single browser tab.
Ready to try it yourself?
Onomo is a creative suite in your browser — a full DAW, a design editor, a video editor and a writing room. Free to start, nothing to install.
Open MotionOther product and company names mentioned here are trademarks of their respective owners. Onomo isn’t affiliated with or endorsed by them. Details about other products are accurate to the best of our knowledge as of the post date and may change.